|
|
|
Photoshop Tutorial on Cel Art Coloring
Well, if you have been through Rc2000's tutorials on drawing cool Kaiju, you'd want to color them, right? Of course you would want to color them! You'd want to make your kaiju look the best! Well, you came to the right page on kaiju coloring, and you came to the right person for professional cel art coloring. I've been told that my cel art resembles Disney cels. That's fine with me!
Anyway, what is cel art, you ask? To make a long story short, cel art is the process of painting cartoon on a plastic cel to be animated by a camera in frames. Cel artists are painters who first trace the comprehensive cleaned draft drawn by the animator and in-between animators, then they proceed to color using various paints on the cel. Many cels are vary valuable, like original cels of Steam Boat Willie, Snow White, and Cinderella.
But now-a-days, cel art has moved to the computer. There are some companies that still do cel art the old fashioned way, painting with paints and brushes, but some companies are using computers to paint their cels. And that is how we are going to learn to paint cel art, by using the computer.
Here are the requirements, one drawing--drawn with pencil or ink, it doesn't matter to me. One computer and Adobe Photoshop 5.5 or better. (Mental note: for those who are using PhS 4, I feel your pain--no History option!) If you don't have Photoshop, you can download a trial version from the Adobe website.
For those who are new to Photoshop, I'll have a page up on how to use it for this exercise, but for you Gurus, you would want to start right away and color!
Basic Reviews and Where I learned this neat trick!
I've been approached by folks who walk by my laptop and I. And the questions are always the same: "Did you do that?" "How did you do that?" "That looks hard!" Well, actually, folks, it isn't. And yes I make it look easy, and yes it is very easy. Believe it or not, after many trials and errors of trying to find a great coloring style, I came upon a site with a tutorial on coloring comics using gradients. And that's the word for today--Gradients. Say it with me--Gradients. Gradients are your friend. When you use them right, they can do wonders to your artwork. And that's the secret to my coloring art. And here's how I do it!
To color using Photoshop, there are steps involved...we'll go over the steps as we go.
Step One!
Draw a picture and don't shade or color in! Make sure it's clean. Then, find a scanner and scan it in! See? Was that hard? No it wasn't. On to step two.
Step Two!
When you finally have your picture scanned in, go to Photoshop and open your file. Make sure it's a picture format--.jpg, .png, .tif, .pic--any of these will work. Now I'm working with a PC, but I've also used Macintoshes too. So, for you Mac users, I'll have all the commands in both PC and Mac format. I know them both by heart and I can do them blind folded! No fooling... And use the commands! It saves time and effort. I say this like a rule, commands are necessary if you want to look professional! (In the Photoshop Basics Page, I'll tell all the commands and what they do. So, you rookies, don't worry.) After you've pulled up your scan, you might notice it looks rather faded. Well, don't fret, that can be adjusted with the Brightness and Contrast option under the Image Pallet. Sorry, that's a Mac term for you PC users. PC users, it's under the Image Menu. Go to the Image Menu and then to Adjust and then to Brightness and Contrast. Check the Preview check box and slide those sliders until you see that your faded lines are darkened. Your image should look something like this.
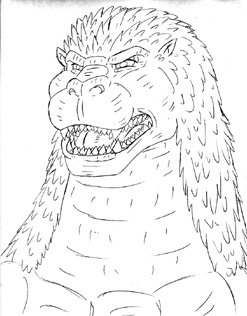
See how dark it is now? Heh, well, I'm using Godzilla as my little test subject to show you guys how it's done. Reason? He's simple to color. I only used 5 different colors plus one gradient color for Goji. If I had Kedzuel up there, we'd be spinnin' our heads around about at least 15 different colors, 10 different gradients, and 5 different highlight and undertones! Eck! No, we're just leaning, so, we'll start something simple. Done with the adjusting our line drawing? Good! Next step!
Step Three!
Okay, guys and gals, this is the dullest step of them all! Cleaning up and testing your picture for leaks! I call this the ****** Step because sometimes I would sit for hours cleaning up some areas, erasing lines that aren't suppose to be there or adding lines so that I can select. Luckily, this is only a 5 color picture, so there's not much cleaning to do. Although your picture may look clean when viewed at 100%, if you go to your Zoom Tool (press the Z key for Zoom) and then zoom into your picture, you'll see gaps where the line should be connecting.

See them? Well, with these gaps, you won't be able to select the area you want to fill in with color properly. So, the gaps need to be closed. Go to your Paintbrush Tool (that's B for brush) and set the brush size to--well the near smallest you got. Don't make the line heavy, but dark. And test the inside areas for leaks using your Magic Wand Tool (that's W for wand). Set the Tolerance to about 32 to 50 pixels, you would want to make sure it grabs all the areas inside the lines. We're not coloring yet, we're just testing for leaks. Make sure those 'marching ants' (a technical term used for selection) aren't going out around your lines, you want them inside your lines--in the areas that you want to fill later with. But once you have your picture cleaned and there are no leaks to worry about, then we can move on to the next step.
Step Four!
Alpha Channel Time! Oh, happy day! Let's make an alpha channel. You'll see why in a second. Well, we have our line drawing, it's cleaned and there are lines where we want them. So, let's make a selection out of those lines! What you would need to do--and this is very important--is to go to the Select Pallet (Select Menu for PC users) and go down to Color Range. Never used it before? Well, you're gonna use it now! When the Dialog Box for Color Range pops up, you'll see your drawing on a widow and you'll see that your pointer has turned into an Eye Dropper. Don't be afraid, this is normal.
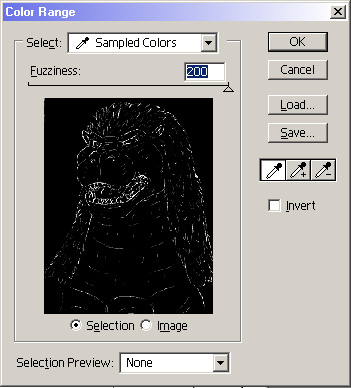
See? There's nothing to be afraid of. Use that eye dropper and click on the black areas. You'll see the small screen turn from black to white. Believe me, doing this takes less time than explaining it. I've never explained how I did my art in detail before. (Mental note: always hit SAVE! Just in case.) ;) Well, anyway, adjust fuzzies--I mean fuzziness to where you want it and then click OK! Now you'll see that your lines have been all selected! Don't do any Alpha channel yet, you'll see that it's only selected the areas outside your lines. Well then hit these three keys SHIFT + COMMAND + I and you'll see that your selection has Inversed. For PC users, hit SIFT + CTRL + I, and you'll get the same thing. And Mac users, if you don't know what the COMMAND key is, I pity you--get off that Mac! Now your lines are selected and you can make an Alpha Channel. Go to your Channels Tab--if it's not showing, then go Window + Show Channels--and you'll find it. When you're in your Channels click on the small arrow on the right and got to New Channel. A little pop up window will appear and it'll say Alpha 1. Click OK and you've just made an Alpha Channel. Good for you! Now, while you're selection still marching with ants, hit Option + Delete, or PC users hit Alt + BACKSPACE, and you'll have your selection filled in black on the Alpha Channel. Now hit COMMAND + D, or PC hit CTRL + D to deselect the selection. Your Alpha Channel should look like your drawing--all black lines! And now you're ready to start coloring. Get back to your Layers Pallet (or Menu) and click on your Background! Then, go to next step.
Coloring!
Step Five!
Here's where the fun starts! Yippee! We get to color at last. And it is like coloring by numbers. Just by selection. Well, we need to make a new Layer, this is where we put our base color down. Go to the Layers Pallet (Menu) an say New Layer. Name that Layer Base Color. Go back to your Background layer and select the areas you want to color. Hit OPTION + DELETE (or alt + backspace) to fill in the selection once you get to your Base Color Layer. Basically, repeat this step until you get all your color in.
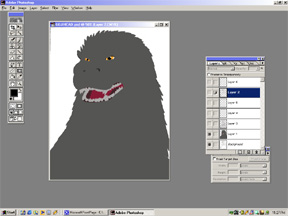
Should look something like this. To make sure there are no gaps, go up to Select and hit Modify + Expand. Expand the selection to 1 pixel and drop fill on your Base Color Layer. Like I said, repeat this step until all your color is in. See, how easy it is?
Step Six!
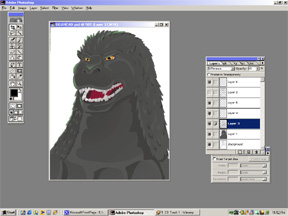
Gradients are your friends, people! They are and they love you so much. Love them back, will ya? This is where we have fun with Gradients. So much fun with them, oooh! Yah! Your Base color should be dark, so that your gradient can be light. But with Goji, I did some opposites, so don't pay any attention to some of these extra stuff you'll see in the picture, like Layer Blending changes and some stuff I did. That's for another tutorial. Well, to use gradients, hit the G key! Now select the Radial Gradient by hitting SHIFT + G several times. Now got to your Gradients menu and tell it to fill Foreground to Transparent. Still with me? Adjust your colors to a shade lighter than your base, and hit new Layers. Sorry, forgot about that. New Layers, and name this one Gradient 1. Unfortunately, when using Gradients, you'll have to make many layers for the places you'd want to have a light area. That's the only draw back. Now, select your area, and go to your Gradient 1 Layer and then click and drag down where you want your gradient to go.

Repeat this step over and over, making sure you make a new layer for each gradient. Done? See, Gradients are our friends. After using the gradients, go and use your Lasso Tool to select the areas that need to be shadows. Select these areas and it Delete (or backspace on PC) and clear these selections out. You'll have the shadows in no time flat! Repeat this step. Time to move on! Next step!
Step Seven!
Air brushes are useful tools. Especially in this tutorial. Go to your layers pallet and make a new layer. Call this layer Highlight. Go to your Lasso Tool and begin drawing around the areas you want highlighted. Remember, highlights are caused by backlighting or ambient lights. Highlights are usually light colors, light blue, lavender, or yellow green. I chose green for Goji because of the ambient glow given off by near by nuclear power plants. Well, after you have your selection made, it the J key for your Airbrush Tool. Gently airbrush your highlights. Remember, highlights are usually on the edges of your object. And don't over highlight.
Now that wasn't hard. Repeat this step until you have your highlights done.
Step Eight!
Last step, I swear! Remember that Alpha Channel we made a while ago? Well, now, it's time to unleash it's power! SAVE your document. Make a new layer and call it Lines. Go to your Alpha Channel and then to the Select menu, and click on Load Selection. After you have your selection loaded, go back to your Lines Layer and start paint brushing in the color to the lines. Use the colors appropriate for those specific lines. Brush carefully and if you mess up, use the Histories Pallet to go back and correct your mistakes.

The lines should start looking like they blend in with the color scheme you laid out for your drawing. And then, when you're done, just sit back and admire your work! Click on the link to see what my finished project looks like!
Now, you know my secret! Feel free to use these techniques and always experiment. That' s how you learn new and cool stuff.